CORS and Zuora v1 API
The Cross-Origin Resource Sharing (CORS) specification provides an additional security mechanism to process some Zuora REST APIs. REST API calls can be made from your customer's browser directly to Zuora using AJAX – securely transferring data, such as a user's personal information – without passing this data through your servers.
This article describes Zuora CORS REST and explains how Zuora REST API calls are made when CORS-enabled.
What is CORS?
CORS is a specification recommended by the Web Applications Working Group within the W3C. CORS provides a way for scripts running in client browsers to use the XMLHttpRequest API object and make direct HTTP requests to resources on domains other than from where the script was first loaded, for example, the Zuora REST API.
CORS provides the following features:
- Guarantees the data integrity of the API request – Nothing changed on its journey from your server to your customer.
- Provides authentication – ensures that the person who generated the request is who they say they are.
Cross-site HTTP requests are HTTP requests for resources from a different domain than the domain of the resource making the request. For instance, a client loads a resource from a server on Domain A (http://domainA.com) such as an HTML web page, which then makes a request for a resource on a different server on Domain B (http://domainB.com), such as an image, using the img element (http://domainB.com/image.jpg). This process is commonly used across the web.
Cross-site HTTP requests initiated from scripts in the client's browser (e.g. JavaScript in your customer's browser) are subject to much tighter restrictions for security reasons. One such restriction is the same-origin policy, meaning these scripts can only make HTTP requests to the same domain they were loaded from, and not to other domains.
How does Secure CORS REST Work at Zuora?
Zuora CORS REST is required only for situations where your customer's browser needs to make direct REST API calls. Zuora CORS REST is not required for most API calls processed between your server and Zuora – when cookies are sufficient. For example, invoking the Connections API does not require CORS REST.
This section explains how a Zuora CORS-invoked request is processed:
- Request for signature and token
- Pre-flight request and REST API request
The following illustrates the Zuora CORS REST request workflow:
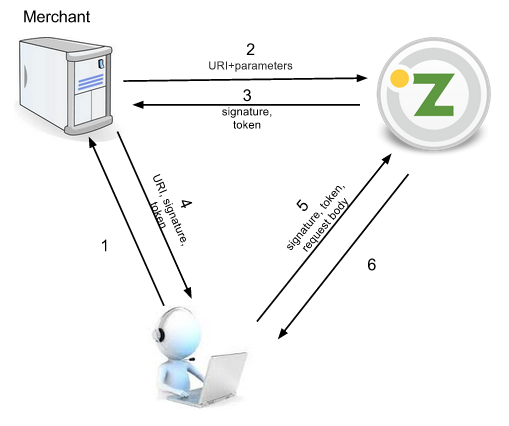
Stage 1: Request for Signature and Token
- A customer visits your website and performs an action that needs to use the Zuora REST API, such as providing credit card information when upgrading to a paid plan.
- Every call by your customer to the REST API via CORS first goes to your website and passes the URI requested by your customer to Zuora. See steps 1 and 2 on the workflow diagram.
- Zuora generates a keyed-hash message authentication code (HMAC) by encrypting the requested URI into a code called a signature. See HMAC Singatures for more information.
- This signature is sent back to your website with a token that is a like a ticket that can only be used by a customer's browser once to call the specific REST API URI that was requested. See step 3 in the workflow diagram.
- Both signature and token are then passed to the customer's browser making the request. See step 4 in the workflow diagram.
Stage 2: Pre-flight request and desired REST API request
- Your customer's browser makes a pre-flight CORS AJAX call to a Zuora REST API. This call includes the recently generated security information in the HTTP header, such as the signature, the token, and a timestamp. See step 5 on the workflow diagram.
- The Zuora API sends an acknowledgement to the browser that the request to that URI is valid, has not been tampered with, and has not timed out. This is a JSON response back to the AJAX callback, which contains the signature and token codes. This is the return journey of the pre-flight request. See step 6 in the workflow diagram.
-
When the AJAX callback receives the response, it automatically makes the call to the desired API. No additional calls are required after the security checks have taken place.
Note: This step is not illustrated, but it is similar to steps 5 and 6 in the workflow diagram.
Which Zuora REST APIs are CORS-Enabled?
The following REST APIs are CORS-enabled:
- Create a credit card payment method - This API creates a new credit card payment method for a specified customer account. See Create a credit card payment method for more information.
- Create an account - This API creates a new customer account with billTo/soldTo contacts and a credit-card payment method. See Create an account for more information.
- Retrieve a file - This API gets the file content by file-id. See Retrieve a file for more information.
- RSA Signatures - This API generates and returns the required digital signature and token for a Payment Pages 2.0 form. See RSA Signatures for more information.
Which Browsers are CORS-Enabled?
If you intend to use Zuora CORS REST to make Javascript client-side calls, then please take note that a small number of web browsers do not currently support CORS, which may limit the user experience for your customers if they frequently visit your site from those browsers. Please refer to the following Wikipedia page for the latest list of browsers that support CORS.
Sample Code: Making REST API Payment calls via CORS
This section explains how to make CORS-invoked REST API calls by using an example.
Suppose you are adding a feature to your website that enables your customers to add a new credit card as a payment method. The button submitting this information contains sensitive credit card details. You decide to code a Zuora CORS REST request to transmit directly to Zuora.
Step 1: Create an HTML Button
Include an HTML button on your website that calls a client-side JavaScript method generateSignature with a callback to the makeCorsRequest method.
HTML Sample
This is an example HTML code snippet for adding a credit card button to your website that calls a Zuora API using CORS:
<input class="btn" type="button" name="submit" value="call zuora" onclick="javascript: generateSignature(makeCorsRequest);">Step 2 - Write a Server-Side HMAC Method
Write a server side method that calls the HMAC API (itself a REST API). This method will have one CORS-enabled REST API URI hard-coded into the request body, which it passes to the HMAC API along with an HTTP method and (optionally) a parameter.
For full details on the HMAC method, visit the HMAC Signatures API reference page.
The Request
JSON Sample for Request Body
To call the HMAC API, you use the following JSON format for the request body:
{
  "uri": "https://api.zuora.com/rest/v1/payment-methods/credit-cards",
  "method": "POST",
  "accountKey": "A00000001"
}
uri and method are always required. accountKey (or other parameter) may be required, depending on the API you are calling; if a parameter is required by the API but not provided, the call will fail. See HMAC Signatures for detailed information.
The URI and parameter are concatenated and hashed together for security, to prevent any malicious modification of parameters.
Acceptable values for method are the standard HTTP methods: ('GET', 'POST', 'PUT', 'DELETE', 'OPTIONS')
Note: You call the HMAC API from your server in the usual way that you make requests to REST APIs. The way you do this depends on various factors specific to your system, such as the programming language that is used, therefore no example code is provided on how to do this.
Response
JSON Sample for Response Body
A successful call with generate a JSON response in the following format:
{
    "signature": "ZmI0ZjE2ZTMxMWY1YjA0ZTc4MTg1ZDhlYWRkMTEwNDE3M2RiMzNiNQ==",
    "token": "gCH6gYqQffQCsFKSLuxyagXsuXcIK0uf",
    "success": true
}
Error Codes
An unsuccessful call will result in an error code being returned in JSON in the following format:
90000011
{
  "success" : false,
  "reasons" : [ {
      "message" : "Invalid token. Note: a token can only be used once.",
      "code" : 90000011
  }]
}
90000010
{
  "success" : false,
  "reasons" : [ {
      "message" : "This API is not CORS enabled.",
      "code" : 90000010
  }]
}
59010220
{
    "success": false,
    "processId" : "1AA4FDFC25059EAD",
    "reasons": [{
        "code": 59010220,
        "message": "'uri' may not be empty"
    }]
}
Step 3 - Write a Client-Side generateSignature Method
Write a generateSignature method which obtains a signature and token from Zuora by invoking the server-side method that calls the HMAC API (as per Step 2). The variable /signature is the name of this server-side method.
The HMAC API then returns the signature and token back to the server, which passes them back to the generateSignature method.
You must define different names for these two methods to the ones described used here. Each method must contain hard-coded values, such as the specific CORS enabled URI. You must define a separate generateSignature JavaScript method and associated server-side HMAC API call for each different URI that you need to be CORS enabled, such as generateSignature_addCreditCard.
JavaScript Sample
 function createXHR(method, url) {
  var xhr = new XMLHttpRequest();
  if (xhr) {
    // XHR for Chrome/Firefox/Opera/Safari.
    xhr.open(method, url, true);
  } else {
    // CORS not supported.
    xhr = null;
  }
  return xhr;
}

function generateSignature(callback) {
  // call your own service to create a signature and token (by call Zuora's POST /v1/hmap-signatures)
  var xhr = createXHR('get', '/signature');
  if (!xhr) {
    alert('CORS not supported');
    return;
  }

  xhr.onload = function() {
    var text = xhr.responseText;
    var json = JSON.parse(text);
    if (json.success) {
      callback(json.signature, json.token);
    }else {
      alert("failed to get a signature from Zuora");
    }

  };

  xhr.onerror = function(error) {
    alert('Whoops, there was an error making the request:' + error);
  };

  try {
    xhr.send();
  } catch (e) {
    alert(e);
  }
}
Step 4 - Write a Client-Side makeCorsRequest Method
Write a makeCorsRequest method which automatically receives the signature and token from the generateSignature via the standard JavaScript callback mechanism, and passes these to the desired REST API in the request body.
A separate makeCorsRequest method is required or each URI that will be will be directly accessed by the client – too will have the URI hard-coded into them e.g. makeCorsRequest_addCreditCard.
JavaScript Sample
// Make the actual CORS request.

function makeCorsRequest(signature, token) {
  var postCreditCardURL = 'https://api.zuora.com/rest/v1/payment-methods/credit-cards';

  var xhr = createXHR('post', postCreditCardURL);
  if (!xhr) {
    alert('CORS not supported');
    return;
  }


  // Set Headers
  xhr.setRequestHeader("Accept", "application/json");
  xhr.setRequestHeader("Content-Type", "application/json");
  xhr.setRequestHeader("signature", signature);
  xhr.setRequestHeader("token", token);

  xhr.withCredentials = true;

  // Response handlers.
  xhr.onload = function() {
    var text = xhr.responseText;

    if (text) {
      var json = JSON.parse(text);

      if (json.success) {
        // successfully create a credit card
        alert("Woohoo, created a credit card in Zuora, its Zuora internal id: " + json.paymentMethodId);
      } else {
        // Your error handling code here, note: the error code is your friend.
      }
    } else
      alert("failed to get response text");
  };

  xhr.onerror = function() {
    alert('Whoops, there was an error making the request.');
  };

  var postCreditCard = {
    "accountKey": document.getElementById("accountKey").value,
    "creditCardType": document.getElementById("creditCardType").value,
    "creditCardNumber": document.getElementById("creditCardNumber").value,
    "expirationMonth": document.getElementById("expirationMonth").value,
    "expirationYear": document.getElementById("expirationYear").value,
    "securityCode": document.getElementById("securityCode").value,
    "defaultPaymentMethod": document.getElementById("defaultPaymentMethod").value
  };

  try {
    xhr.send(JSON.stringify(postCreditCard));
  } catch (e) {
    alert(e);
  }
}