# Get started

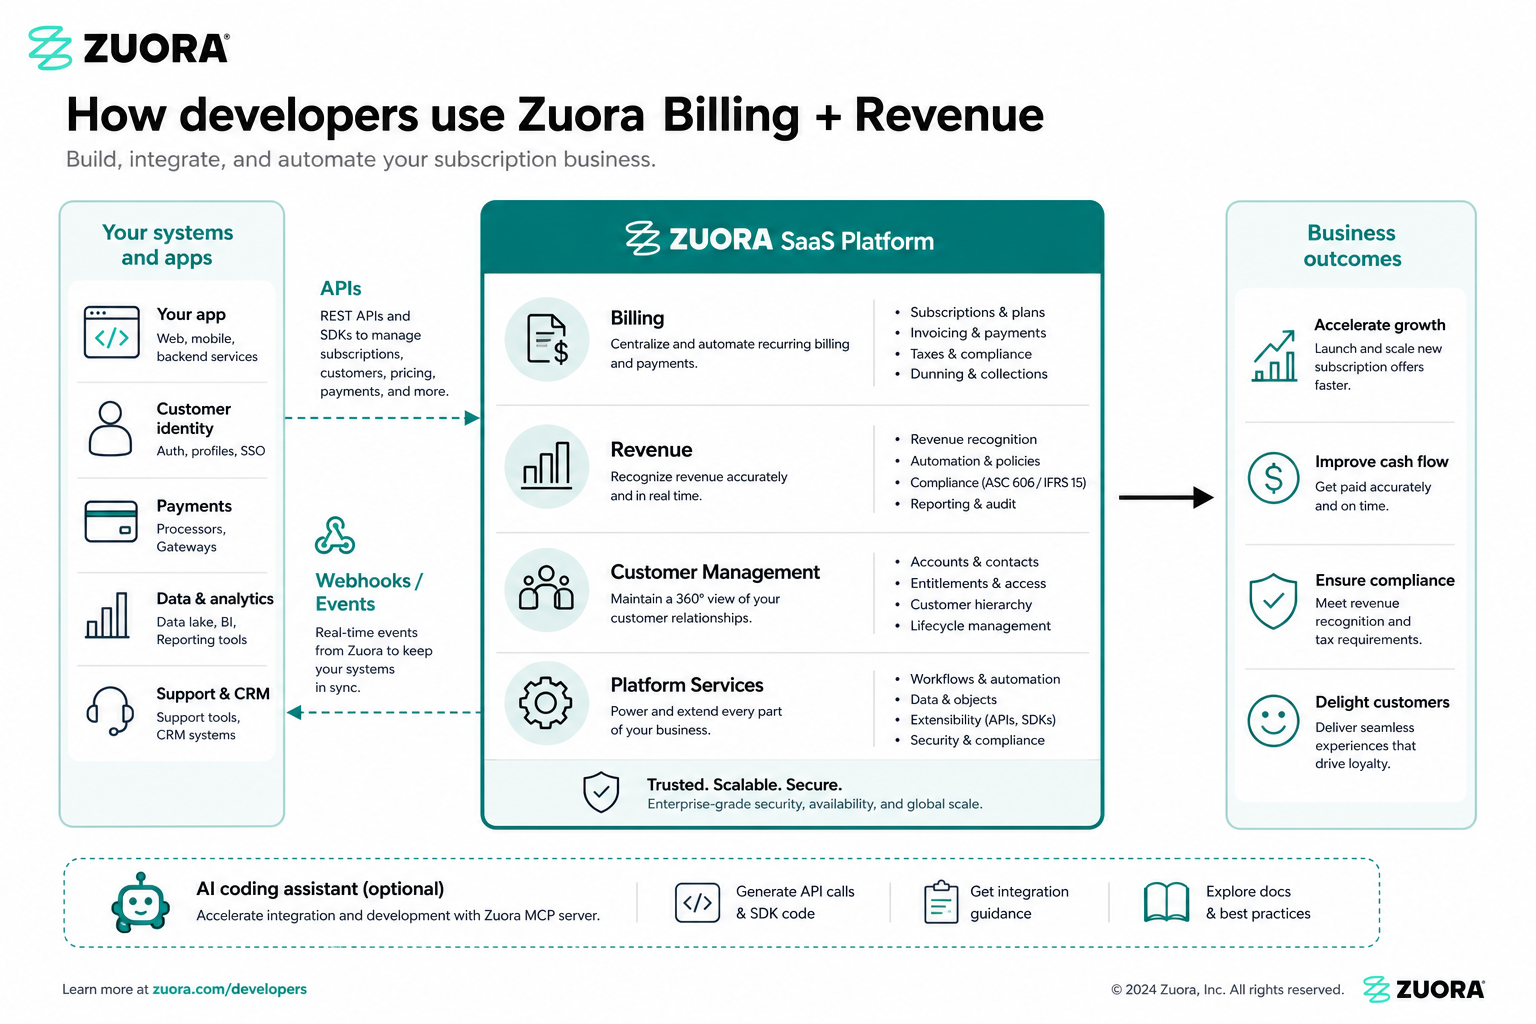
This page and the "Tutorials" section in the left-hand menu provide code examples in either our REST API or the client libraries.

Use this content as a guide to set up your local development environment and send your first API request. This content will guide you through:

- How to set up your development environment
- How to install the latest client libraries (SDK)
- Some basic concepts
- How to send your first API request using cURL or Zuora client libraries

img
If you run into any issues or have questions, join our Developers Community to find answers or raise your questions.

## Tenant setup

This tutorial assumes that you are using either a Zuora-provided test drive, or your own Zuora Sandbox environment.

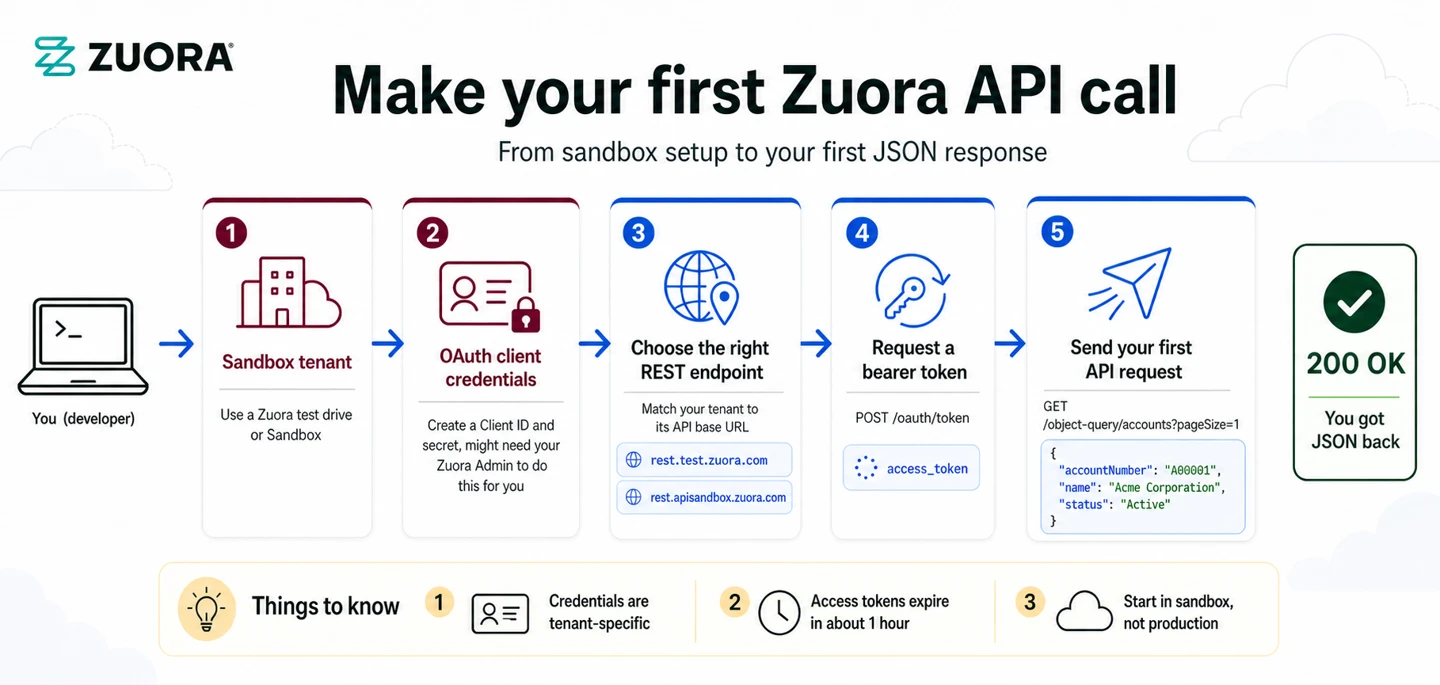
The following diagram describes the workflow to make your first call with Zuora API:
img
## OAuth client setup

Accessing the Zuora API requires a user account with the necessary privileges. Zuora recommends using OAuth 2.0 for all API interactions and using a dedicated user account with the API write access for all API or client libraries interactions.

Establishing such a user account requires either being an administrator in the Zuora tenant or having access to your coworkers who are administrators in the tenant.

For the step-by-step instructions on how to create an OAuth client, see the following video:

iframe
The text content for this video tutorial is also available [here](/docs/get-started/oauth-client-setup-steps).

Note that a different Client ID and Secret are needed for each tenant, for example, sandbox or production.

### Find the correct REST endpoint for your development tenant

Log into the Zuora UI and identify the URL root of the UI page in the **User Interface root URL** column, then identify the corresponding REST API URL root. If the URL starts with `one.zuora.com`, you should choose the tenant for which you have an OAuth client ID and secret first.
Our Production tenants are intentionally absent from this table.

| Environment | User Interface root URL | REST root URL | SDK enum value |
|  --- | --- | --- | --- |
| US Cloud 1 APISandbox | [https://sandbox.na.zuora.com](https://rest.test.zuora.com/) | [https://rest.sandbox.na.zuora.com/](https://rest.test.zuora.com/) | SBX_NA |
| US Cloud 1 Central & Dev Sandbox | [https://test.zuora.com](https://test.zuora.com) | [https://rest.test.zuora.com/](https://test.zuora.com/) | CSBX |
| US Cloud 2 APISandbox | [https://apisandbox.zuora.com](https://apisandbox.zuora.com) | [https://rest.apisandbox.zuora.com/](https://rest.apisandbox.zuora.com/) | SBX |
| EU Cloud APISandbox | [https://sandbox.eu.zuora.com](https://sandbox.eu.zuora.com) | [https://rest.sandbox.eu.zuora.com/](https://rest.sandbox.eu.zuora.com/) | SBX_EU |
| EU Cloud Central & Dev Sandbox | [https://test.eu.zuora.com](https://test.eu.zuora.com) | [https://rest.test.eu.zuora.com/](https://rest.test.eu.zuora.com/) | CSBX_EU |
| APAC Developer & Central Sandbox | [https://test.ap.zuora.com](https://test.ap.zuora.com) | [https://rest.test.ap.zuora.com/](https://rest.test.ap.zuora.com/) | CSBX_AP |


## Getting started language selection

Select tool or language you want to use to get started.

cURL
cURL is a popular command-line tool for transferring data using network protocols like HTTP and HTTPS. ​​It requires minimal setup but is less capable than fully-featured programming languages like Java or JavaScript.
With cURL installed, you can enter the cURL commands in the Terminal or Command Prompt and see the response immediately.

## Step 1. Set up cURL

cURL is pre-installed on some operating systems by default, for example, MacOS or Linux.
Check whether you have cURL installed by opening your Terminal or command line interface by entering the command:


```bash terminal
curl / docs/get-started/introduction/ --compressed
```

With cURL set up this will send an HTTP request to fetch the contents of "developer.zuora.com/docs/get-started/introduction/".

If you see an error indicating that cURL is not found, you should install it by following the instructions on the Install curl and libcurl.

## Step 2: Set up authentication credentials

After you confirm that cURL is installed, you can set up your credentials in your Terminal or Command Prompt.

### MacOS/Linux

1. **Open Terminal**: You can search for `terminal` through Spotlight Search or find it in the **Applications** folder.
2. **Edit bash profile**: To open the profile file in a text editor, enter the command `nano ~/.bash_profile` or `nano ~/.zshrc` (for newer MacOS versions).
3. **Add your client credentials as environment variables**: In the editor, add the following lines to the profile file, replacing `your-client-id` with your client ID and `your-client-secret` with your client secret:


```bash terminal
export ZUORA_CLIENT_ID='your-client-id'
export ZUORA_CLIENT_SECRET='your-client-secret'
```

1. **Save the changes**: To save the changes, press `Ctrl` + `O`. At the filename prompt, press `Enter`, then press `Control` + `X` to exit the editor.
2. **Load the updated profile**: Use the command `source ~/.bash_profile` or `source ~/.zshrc` to load the updated profile.
3. **Setup verification**: Verify the setup by entering `echo $ZUORA_CLIENT_ID` in the Terminal. It should display your client ID. Enter `echo $ZUORA_CLIENT_SECRET` in the Terminal and it should display your client secret.
4. **Create a bearer token**: Send a request to [Create an OAuth token](/v1-api-reference/api/oauth/createtoken) to generate an OAuth bearer token.


```bash cURL
curl --request POST \
  --url https://rest.test.zuora.com/oauth/token \
  --header 'Accept: application/json' \
  --header 'Content-type: application/x-www-form-urlencoded' \
  --data client_id=$ZUORA_CLIENT_ID \
  --data-urlencode client_secret=$ZUORA_CLIENT_SECRET \
  --data grant_type=client_credentials
```

**Response body**


```json JSON
{
    "access_token": "6447d349d8854f0d8d5535484b0b811b",
    "token_type": "bearer",
    "expires_in": 3598,
    "scope": "entity.11e643f4-a3ee-8bad-b061-0025904c57d6 platform.write service.genesis.read service.genesis.write service.usage.delete service.usage.update service.usage.write tenant.12270 user.2c92c0f86680fd7777777ad86e455692",
    "jti": "6447d34955555f0d8d5535484b0b862b"
}
```

Each bearer token is valid for an hour. When it expires, repeat this step again.

### Windows

1. **Open Command Prompt**: You can find it by searching `cmd` in the **Start** menu.
2. **Configure environment variable, in the current session or permanently**.
  - **Set environment variables in the current session**: To set the `ZUORA_CLIENT_ID` environment variable in the current session, use the following command and replace `your-client-id` with your client ID:

```bash
setx ZUORA_CLIENT_ID "your-client-id"
```
To set the `ZUORA_CLIENT_SECRET` environment variable in the current session, use the following command and replace `your-client-secret` with your client secret:

```bash
setx ZUORA_CLIENT_SECRET "your-client-secret"
```
  - **Permanent setup**: Alternative to setting variables for the session, you can make the setup permanent by adding your client credentials as system properties:
    1. Right-click the **This PC** or **My Computer** option, and select **Properties**.
    2. Click **Advanced system settings**.
    3. Click the **Environment Variables** button.
    4. In the **System variables** section, click **New...**, and enter `ZUORA_CLIENT_ID` as the variable name and your client ID as the variable value.
    5. In the **System variables** section, click **New...**, and enter `ZUORA_CLIENT_SECRET` as the variable name and your client secret as the variable value.
3. **Setup verification**: Reopen the Command Prompt and enter the following command. It should display your client ID and secret:


```bash
echo %ZUORA_CLIENT_ID%
echo %ZUORA_CLIENT_SECRET%
```

1. **Create a bearer token**: Send a request to [Create an OAuth token](/v1-api-reference/api/oauth/createtoken) to generate an OAuth bearer token.


```bash cURL
curl --request POST \
  --url https://rest.test.zuora.com/oauth/token \
  --header 'Accept: application/json' \
  --header 'Content-type: application/x-www-form-urlencoded' \
  --data client_id=%ZUORA_CLIENT_ID% \
  --data-urlencode client_secret=%ZUORA_CLIENT_SECRET% \
  --data grant_type=client_credentials
```

**Response body**


```json JSON
{
    "access_token": "6234d349d8854f0d8d5535484b0b862b",
    "token_type": "bearer",
    "expires_in": 3598,
    "scope": "entity.11e643f4-a3ee-8bad-b061-0025904c57d6 platform.write service.genesis.read service.genesis.write service.usage.delete service.usage.update service.usage.write tenant.12270 user.2c92c0f86680fd7777777ad86e455692",
    "jti": "6447d34955555f0d8d5535484b0b862b"
}
```

Each bearer token is valid for an hour. When it expires, you just repeat this step again.

## Step 3. Send your first request

Now, you can send your first API request. A sample cURL request to query all customer accounts in your tenant is provided below.
The page size is set to 1 for easier validation.

Customer accounts capture your customers' billing and payment details.
Regardless of whether your customers are individuals or companies, the customer account is where Zuora captures their name, their addresses for billing and tax purposes, their payment methods, the orders they’ve placed for your products and services, and many other details.
This is a topic you can explore in more depth in Manage customer accounts in our Knowledge Center.

Note that you should replace `your-bearer-token` with the bearer token you generated in Step 2.


```bash cURL
curl -L -X GET 'https://rest.test.zuora.com/object-query/accounts?pageSize=1' \
-H 'Authorization: Bearer 6234d349d8854f0d8d5535484b0b862b'
```

If your tenant has billing accounts, you will receive a response similar to the following sample response:


```json JSON
{
    "nextPage": "W3sidmFsdWUiOiIyMDI0LTA3LTI1VDAyOjQ2OjIwWiIsIm9yZGVyQnkiOnsiZmllbGQiOiJVcGRhdGVkRGF0ZSIsIm9yZGVyIjoiREVTQyJ9fSx7InZhbHVlIjoiOGE4YWEzYmM5MGM0ZjE2OTAxOTBlN2MyNTQ1ZjNjODYiLCJvcmRlckJ5Ijp7ImZpZWxkIjoiSWQiLCJvcmRlciI6IkRFU0MifX1d",
    "data": [
        {
            "accountNumber": "A00000019",
            "allowInvoiceEdit": false,
            "autoPay": true,
            "balance": 0.0,
            "batch": "Batch1",
            "bcdSettingOption": "AutoSet",
            "billCycleDay": 25,
            "billToId": "8a8aa3bc90c4f1690190e7c254eb3c8d",
            "createdById": "c4c98efdaf78374783d85c22e0338e53",
            "createdDate": "2024-07-25T02:39:50Z",
            "creditBalance": 0.0,
            "currency": "USD",
            "defaultPaymentMethodId": "8a8aa3bc90c4f1690190e7c2566e3cb8",
            "id": "8a8aa3bc90c4f1690190e7c2545f3c86",
            "invoiceDeliveryPrefsEmail": true,
            "invoiceDeliveryPrefsPrint": false,
            "invoiceTemplateId": "8a368bbf87b6d5910187b80ab8f40d0b",
            "lastInvoiceDate": "2024-07-25",
            "mrr": 299.9,
            "name": "Test Customer 3",
            "partnerAccount": false,
            "paymentMethodCascadingConsent": false,
            "paymentTerm": "Due Upon Receipt",
            "soldToId": "8a8aa3bc90c4f1690190e7c2555f3ca4",
            "status": "Active",
            "taxExemptStatus": "No",
            "totalDebitMemoBalance": 0.0,
            "totalInvoiceBalance": 0.0,
            "unappliedBalance": 0.0,
            "unappliedCreditMemoAmount": 0.0,
            "updatedById": "c4c98efdaf78374783d85c22e0338e53",
            "updatedDate": "2024-07-25T02:46:20Z"
        }
    ]
}
```

Congratulations! You’ve made your first request to Zuora throught the REST API!

## Next steps

We provide step-by-step tutorials for using the Zuora API and client libraries to complete typical business-to-consumer(B2C) business flows. Check our [Tutorials](/docs/get-started/tutorials) to learn more.

Java
Java is one of the world's most widely used programming languages. Zuora provides a custom Java library which makes working with the Zuora API in Java simple and efficient.

**Requirement**: Java 11 or a later version

The sample codes in this tutorial are created based on a Java 17 environment.

## Step 1: Install the Zuora Java library

**Maven**

Add the following `zuora-sdk-java` dependency to the dependencies in the `pom.xml` file of your project:


```xml pom.xml
<dependency>
    <groupId>com.zuora.sdk</groupId>
    <artifactId>zuora-sdk-java</artifactId>
    <version>$version</version>
</dependency>
```

 
Make sure to replace `$version` with the latest Zuora Java library version.

After adding the dependency, start building your project. Maven will automatically download the Zuora SDK and its dependencies during the build process.

**Gradle**

To install the Zuora Java SDK, add `zuora-sdk-java` to the dependencies block of your `build.gradle` file:


```bash build.gradle
dependencies {
  implementation("com.zuora.sdk:zuora-sdk-java:$version")
  // ...
}
```

Make sure to replace `$version` with the latest Zuora Java library version.

After adding the dependency, start building your project. Gradle will automatically download the Zuora client library and its dependencies during the build process.

## Step 2: Set up your client id and secret

### Set up your client id and secret for all projects (recommended)

The main advantage of making your client id and secret accessible for all projects is that our SDK will automatically detect it and use it without having to write any code.

### MacOS/Linux

1. **Open Terminal**: You can find it in the Applications folder or search for it using Spotlight (Command + Space).
2. **Edit bash profile**: Use the command `nano ~/.bash_profile` or `nano ~/.zshrc` (for newer MacOS versions) to open the profile file in a text editor.
3. **Add environment variables**: In the editor, add the line below, replacing `your-client-id-here` with your client id:


```bash terminal
export ZUORA_CLIENT_ID='your-client-id-here'
```

 
In the editor, add the line below, replacing `your-client-secret-here` with your client secret:


```bash terminal
export ZUORA_CLIENT_SECRET='your-client-secret-here'
```


1. **Save and exit**: Press Ctrl+O to write the changes, followed by Ctrl+X to close the editor.
2. **Load your profile**: Use the command `source ~/.bash_profile` or `source ~/.zshrc` to load the updated profile.
3. **Verification**: Verify the setup by typing `echo $ZUORA_CLIENT_ID` in the terminal and it should display your client id; type  `echo $ZUORA_CLIENT_SECRET` and it should display your client secret.


### Windows

1. **Open Command Prompt**: You can find it by searching "cmd" in the start menu.
2. **Set environment variables in the current session**: To set the `ZUORA_CLIENT_ID` environment variable in the current session, use the command below, replacing `your-client-id-here` with your client id:


```bash
setx ZUORA_CLIENT_ID "your-client-id-here"
```

 
This command will set the `ZUORA_CLIENT_ID` environment variable for the current session.
 
To set the `ZUORA_CLIENT_SECRET` environment variable in the current session, use the command below, replacing `your-client-secret-here` with your client secret:


```bash
setx ZUORA_CLIENT_SECRET "your-client-secret-here"
```

 
This command will set the `ZUORA_CLIENT_SECRET` environment variable for the current session.

1. **Permanent setup**: To make the setup permanent, add the variables through the system properties as follows:
  - Right-click **This PC** or **My Computer** and select **Properties**.
  - Click **Advanced system settings**.
  - Click **Environment Variables**.
  - In the **System variables** section, click **New...** and enter `ZUORA_CLIENT_ID` as the variable name and your client id as the variable value.
  - In the **System variables** section, click **New...** and enter `ZUORA_CLIENT_SECRET` as the variable name and your client secret as the variable value.
2. **Verification**: To verify the setup, reopen the command prompt and type the commands below. These should display your client id and secret:


```bash
echo %ZUORA_CLIENT_ID%
echo %ZUORA_CLIENT_SECRET%
```

## Step 3: Send your first request

The following code sample declares the credentials and the environment of the new ZuoraClient instance, then initializes this instance before running a query that returns a list of the customer accounts from your tenant.

Customer accounts capture your customers' billing and payment details.
Regardless of whether your customers are individuals or companies, the customer account is where Zuora captures their name, their addresses for billing and tax purposes, their methods of payment, the orders they’ve placed for your products and services, and many other details.
This is a topic you can explore in more depth in Manage customer accounts in our Knowledge Center.


```java Java
import com.zuora.ZuoraClient;
import com.zuora.ApiException;
import com.zuora.model.QueryAccountsResponse;


public class SampleApp {

  public static void main(String[] args) throws ApiException {

    //Create a new ZuoraClient instance, then initialize it
    ZuoraClient zuoraClient = new ZuoraClient.Builder()
            .withClientId("yourClientId")
            .withClientSecret("yourClientSecret")
            .withZuoraEnv(ZuoraClient.ZuoraEnv.CSBX)
            .build();

    zuoraClient.initialize();

   //Add your code logic here
    QueryAccountsResponse accountsList = zuoraClient.objectQueriesApi()
                .queryAccountsApi()
                .pageSize(1)
                .execute();

    System.out.print(accountsList);
  }
}
```

**Note:** You should import the `com.zuora.ZuoraClient` package instead of `com.zuora.sdk.ZuoraClient`. `com.zuora.sdk.ZuoraClient` is a legacy package and is added only for backward compatibility.

Run the SampleApp.java file. You should get a response similar to the following snippet:


```java
class QueryAccountsResponse {
    data: [class ExpandedAccount {
        id: 8a8aa3bc90c4f1690190e7c2545f3c86
        createdById: c4c98efdaf78374783d85c22e0338e53
        createdDate: 2024-07-25T02:39:50Z
        updatedById: c4c98efdaf78374783d85c22e0338e53
        updatedDate: 2024-07-25T02:46:20Z
        accountNumber: A00000019
        additionalEmailAddresses: null
        allowInvoiceEdit: false
        autoPay: true
        balance: 0.0
        batch: Batch1
        bcdSettingOption: AutoSet
        billCycleDay: 25
        billToId: 8a8aa3bc90c4f1690190e7c254eb3c8d
        communicationProfileId: null
        creditBalance: 0.0
        crmId: null
        currency: USD
        customerServiceRepName: null
        defaultPaymentMethodId: 8a8aa3bc90c4f1690190e7c2566e3cb8
        eInvoiceProfileId: null
        invoiceDeliveryPrefsEmail: true
        invoiceDeliveryPrefsPrint: false
        invoiceTemplateId: 8a368bbf87b6d5910187b80ab8f40d0b
        lastInvoiceDate: 2024-07-25
        lastMetricsUpdate: null
        name: Test Customer 3
        notes: null
        organizationId: null
        parentId: null
        partnerAccount: false
        paymentMethodCascadingConsent: false
        purchaseOrderNumber: null
        salesRepName: null
        sequenceSetId: null
        soldToId: 8a8aa3bc90c4f1690190e7c2555f3ca4
        status: Active
        taxCompanyCode: null
        taxExemptCertificateID: null
        taxExemptCertificateType: null
        taxExemptDescription: null
        taxExemptEffectiveDate: null
        taxExemptEntityUseCode: null
        taxExemptExpirationDate: null
        taxExemptIssuingJurisdiction: null
        taxExemptStatus: No
        totalInvoiceBalance: 0.0
        unappliedBalance: 0.0
        vATId: null
        mrr: 299.9
        totalDebitMemoBalance: 0.0
        unappliedCreditMemoAmount: 0.0
        creditMemoTemplateId: null
        debitMemoTemplateId: null
        paymentGateway: null
        paymentTerm: Due Upon Receipt
        billTo: null
        soldTo: null
        defaultPaymentMethod: null
        subscriptions: null
        payments: null
        refunds: null
        creditMemos: null
        debitMemos: null
        invoices: null
        usages: null
        paymentMethods: null
        additionalProperties: null
    }]
    nextPage: W3sidmFsdWUiOiIyMDI0LTA3LTI1VDAyOjQ2OjIwWiIsIm9yZGVyQnkiOnsiZmllbGQiOiJVcGRhdGVkRGF0ZSIsIm9yZGVyIjoiREVTQyJ9fSx7InZhbHVlIjoiOGE4YWEzYmM5MGM0ZjE2OTAxOTBlN2MyNTQ1ZjNjODYiLCJvcmRlckJ5Ijp7ImZpZWxkIjoiSWQiLCJvcmRlciI6IkRFU0MifX1d
    additionalProperties: null
}
```

Congratulations! You’ve made your first request to Zuora with the Java client library!

## Next steps

We provide step-by-step tutorials for using the Zuora API and client libraries to complete typical business-to-consumer(B2C) business flows. Check our [Tutorials](/docs/get-started/tutorials) to learn more.

Node.js
Node.js is a popular JavaScript framework that is commonly used for web development. Zuora provides a custom Node.js library that makes working with the Zuora API in JavaScript simple and efficient.

## Step 1: Setting up Node

### Install Node.js

To use the Zuora Node.js library, you will need to ensure you have Node.js installed.

**Note**: The sample codes in this tutorial are created based on the following environment versions:

- NPM: 10.8.2
- Node: 20.16.0


To download Node.js, head to the [official Node.js website](https://nodejs.org/en/download) and download the LTS version. If you are installing Node.js for the first time, you can follow the [official Node.js usage guide](https://nodejs.org/api/synopsis.html#usage) to get started.

### Install the Zuora Node library

Once you have Node.js installed, the Zuora Node.js library can be installed. From the terminal / command line, run:


```bash
npm i zuora-sdk-js
```

For more information about Zuora Node.js libraries, check Zuora JS SDK.

## Step 2: Set up your client id and secret

Set the client ID and client secret in the `.env` file of your Node.js project. The following code snippet is a sample `.env` file:


```bash .env
ZUORA_CLIENT_ID=a0d49f9c-9f65-4e95-b55a-0b634f9d5348
ZUORA_CLIENT_SECRET=v1thGTMRjffbRMJ6B3FvZgzY/Kf8VmG7WK4B142
```

## Step 3: Send your first API request

Copy the following code snippet to the app.js or index.js file of your Node.js project to query all customer accounts from your tenant.

Customer accounts capture your customers' billing and payment details.
Regardless of whether your customers are individuals or companies, the customer account is where Zuora captures their name, their addresses for billing and tax purposes, their methods of payment, the orders they’ve placed for your products and services, and many other details.

This is a topic you can explore in more depth in Manage customer accounts in our Knowledge Center.


```javascript Node.js
const {ZuoraClient} = require("zuora-sdk-js");

(async () => {
    try {
        const clientId = process.env.ZUORA_CLIENT_ID;
        const clientSecret = process.env.ZUORA_CLIENT_SECRET;
        const zuoraClient = new ZuoraClient({
            clientId: clientId,
            clientSecret: clientSecret,
            env: 'CSBX',
        });

        await zuoraClient.initialize();

        // Query all accounts via the Object Query API. You can replace it with other business logics here
        const accounts = await zuoraClient.objectQueriesApi.queryAccounts({
          expand: ['subscriptions'],
          page_size: 1,
        });
        console.log(JSON.stringify(accounts, (k, v) => v ?? undefined, 2))


    } catch (error) {
        console.log(error);
    }
})();
```

Then run the following command in the terminal:


```bash terminal
node --env-file=.env app.js
```

If the request succeeds, you should get a response similar to the following snippet:


```json JSON
{
  "nextPage": "W3sib3JkZXJCeSI6eyJmaWVsZCI6IlVwZGF0ZWREYXRlIiwib3JkZXIiOiJERVNDIn0sInZhbHVlIjoiMjAyNC0wOC0xNFQxNzo1Nzo1OC0wNzowMCJ9LHsib3JkZXJCeSI6eyJmaWVsZCI6IklkIiwib3JkZXIiOiJERVNDIn0sInZhbHVlIjoiOGI0OGYxNThmZWMyZWFlOTQ5ZTVkNDVjNzgzNTFlNjIifV0=",
  "data": [
    {
      "accountNumber": "A00000369",
      "additionalEmailAddresses": "test@gmail.com",
      "allowInvoiceEdit": false,
      "autoPay": false,
      "balance": 307234.97,
      "batch": "Batch14",
      "bcdSettingOption": "ManualSet",
      "billCycleDay": 1,
      "billToId": "8b48f15825aedd978a66842d78bd7152",
      "communicationProfileId": "8b48f1584b974b0a1801a9d78e3901f7",
      "createdById": "8b48f1586229064365d732c1e7e26c6c",
      "createdDate": "2018-05-24T14:13:26-07:00",
      "creditBalance": 0,
      "creditMemoTemplateId": "8b48f158d970046c9cb5cd480ffb5dc9",
      "crmId": "0015G00001e7VLH",
      "currency": "USD",
      "customerServiceRepName": "",
      "debitMemoTemplateId": "8b48f15859e530b85c77c29a41d17732",
      "defaultPaymentMethodId": "8b48f158194bf5e7113b64a13ab1dd20",
      "id": "8b48f158fec2eae949e5d45c78351e62",
      "invoiceDeliveryPrefsEmail": true,
      "invoiceDeliveryPrefsPrint": false,
      "invoiceTemplateId": "8ad097f487702b120187749c058f45b6",
      "lastInvoiceDate": "2024-05-09T00:00:00.000Z",
      "mrr": 22.33,
      "name": "Test Account",
      "notes": "Demo test data run on 2018-05-24 18:13:24",
      "partnerAccount": false,
      "paymentMethodCascadingConsent": false,
      "paymentTerm": "Due Upon Receipt",
      "purchaseOrderNumber": "PO-0001",
      "salesRepName": "",
      "soldToId": "8b48f1586353bdfeaa56afbe9256e22c",
      "status": "Active",
      "taxCompanyCode": "",
      "taxExemptCertificateID": "",
      "taxExemptCertificateType": "",
      "taxExemptDescription": "",
      "taxExemptEntityUseCode": "",
      "taxExemptIssuingJurisdiction": "",
      "taxExemptStatus": "No",
      "totalDebitMemoBalance": 3074.5,
      "totalInvoiceBalance": 314283.26,
      "unappliedBalance": 4071.5,
      "unappliedCreditMemoAmount": 6051.29,
      "updatedById": "2c92c0f87628866101762fede1893d27",
      "updatedDate": "2024-08-14T17:57:58-07:00",
      "vATId": "",
      "subscriptions": [
        {
          "accountId": "8b48f158fec2eae949e5d45c78351e62",
          "autoRenew": true,
          "cMRR": 0,
          "contractEffectiveDate": "2024-07-31T00:00:00.000Z",
          "createdById": "2c92c0f97056acdb01705a14971835d6",
          "createdDate": "2024-07-30T23:59:28-07:00",
          "creatorAccountId": "8b48f158fec2eae949e5d45c78351e62",
          "creatorInvoiceOwnerId": "8b48f158fec2eae949e5d45c78351e62",
          "currency": "USD",
          "currentTerm": 12,
          "currentTermPeriodType": "Month",
          "id": "8ad099a99102dcbd019107962ef36516",
          "initialTerm": 12,
          "initialTermPeriodType": "Month",
          "invoiceOwnerId": "8b48f158fec2eae949e5d45c78351e62",
          "isInvoiceSeparate": false,
          "isLatestVersion": true,
          "isSingleVersioned": false,
          "lastBookingDate": "2024-07-31T00:00:00.000Z",
          "name": "A-S00024148",
          "orderId": "8ad099a99102dcbd019107962e9e6511",
          "originalCreatedDate": "2024-07-30T23:59:28-07:00",
          "originalId": "8ad099a99102dcbd019107962ef36516",
          "prepayment": false,
          "renewalSetting": "RENEW_WITH_SPECIFIC_TERM",
          "renewalTerm": 12,
          "renewalTermPeriodType": "Month",
          "revision": "1.0",
          "status": "Pending Activation",
          "subscriptionEndDate": "2025-07-31T00:00:00.000Z",
          "subscriptionStartDate": "2024-07-31T00:00:00.000Z",
          "subscriptionVersionAmendmentId": "8ad099a99102dcbd019107962e9e6512",
          "termEndDate": "2025-07-31T00:00:00.000Z",
          "termStartDate": "2024-07-31T00:00:00.000Z",
          "termType": "TERMED",
          "updatedById": "2c92c0f97056acdb01705a14971835d6",
          "updatedDate": "2024-07-30T23:59:28-07:00",
          "version": 1
        }
      ]
    }
  ]
}
```

Congratulations! You’ve made your first request to Zuora with the Node.js client library!

## Next steps

We provide step-by-step tutorials for using the Zuora API and client libraries to complete typical business-to-consumer(B2C) business flows. Check our [Tutorials](/docs/get-started/tutorials) to learn more.

Python
## Step 1: Install Python

**Requirement**: Python 3.9+, Pydantic 2.6+

You can download and install Python by following the Python official guide.

## Step 2: Install the Zuora Python library

You can install the latest version of the Zuora's Python library via `pip`:


```bash terminal
pip install zuora-sdk
```

If you do not want to install the latest version of Zuora's Python client library, you can take the following steps to install a previous version:

1. Create a `requirements.txt` file that contains the following dependencies:


```bash
zuora-sdk==$version
python-dotenv
```

Make sure to replace `$version` with an available Zuora Python library version.

1. Run the following command in the terminal:


```bash terminal
pip install -r requirements.txt
```

## Step 3: Set up your client ID and secret

The main advantage of making your client id and secret accessible for all projects is that our SDK will automatically detect it and use it without having to write any code.

### MacOS/Linux

1. **Open Terminal**: You can search for `terminal` through Spotlight Search or find it in the **Applications** folder.
2. **Edit bash profile**: To open the profile file in a text editor, enter the command `nano ~/.bash_profile` or `nano ~/.zshrc` (for newer MacOS versions).
3. **Add your client credentials as environment variables**: In the editor, add the following lines to the profile file, replacing `your-client-id` with your client ID and `your-client-secret` with your client secret:


```bash
export ZUORA_CLIENT_ID='your-client-id'
export ZUORA_CLIENT_SECRET='your-client-secret'
```

1. **Save the changes**: To save the changes, press `Ctrl` + `O`. At the filename prompt, press `Enter`, then press `Control` + `X` to exit the editor.
2. **Load the updated profile**: Use the command `source ~/.bash_profile` or `source ~/.zshrc` to load the updated profile.
3. **Setup verification**: Verify the setup by entering `echo $ZUORA_CLIENT_ID` in the Terminal. It should display your client ID. Enter `echo $ZUORA_CLIENT_SECRET` in the Terminal and it should display your client secret.


### Windows

1. **Open Command Prompt**: You can find it by searching `cmd` in the **Start** menu.
2. **Configure environment variable, in the current session or permanently**.
  - **Set environment variables in the current session**: To set the `ZUORA_CLIENT_ID` environment variable in the current session, use the following command and replace `your-client-id` with your client ID:

```bash
setx ZUORA_CLIENT_ID "your-client-id"
```
To set the `ZUORA_CLIENT_SECRET` environment variable in the current session, use the following command and replace `your-client-secret` with your client secret:

```bash
setx ZUORA_CLIENT_SECRET "your-client-secret"
```
  - **Permanent setup**: Alternative to setting variables for the session, you can make the setup permanent by adding your client credentials as system properties:
    1. Right-click the **This PC** or **My Computer** option, and select **Properties**.
    2. Click **Advanced system settings**.
    3. Click the **Environment Variables** button.
    4. In the **System variables** section, click **New...**, and enter `ZUORA_CLIENT_ID` as the variable name and your client ID as the variable value.
    5. In the **System variables** section, click **New...**, and enter `ZUORA_CLIENT_SECRET` as the variable name and your client secret as the variable value.
3. **Setup verification**: Reopen the Command Prompt and enter the following command. It should display your client ID and secret:


```bash
echo %ZUORA_CLIENT_ID%
echo %ZUORA_CLIENT_SECRET%
```

## Step 4: Send your first API request

Copy the following code to your `SampleApp.py` file to query all customer accounts from your tenant.

Customer accounts capture your customers' billing and payment details.
Regardless of whether your customers are individuals or companies, the customer account is where Zuora captures their name, their addresses for billing and tax purposes, their methods of payment, the orders they’ve placed for your products and services, and many other details.
This is a topic you can explore in more depth in Manage customer accounts in our Knowledge Center.


```python Python
import os
from zuora_sdk.zuora_client import ZuoraClient, ZuoraEnvironment
from zuora_sdk.rest import ApiException
from dotenv import load_dotenv

load_dotenv()

## Create and initialize the OAuth client
​​def get_client():
    try:
        client = ZuoraClient(client_id=os.environ.get('ZUORA_CLIENT_ID'),
                             client_secret=os.environ.get('ZUORA_CLIENT_SECRET'),
                             env=ZuoraEnvironment.CSBX)
        client.initialize()
    except ApiException as ex:
        print("Error create api client", ex)
    else:
        return client

## Define different functions here in each scenario
def query_accounts(client=None, **kwargs):
    if client is None:
        client = get_client()
    try:
        api_response = client.object_queries_api().query_accounts(**kwargs)
        return api_response
    except ApiException as e:
        print("Exception when calling ObjectQueriesApi->query_account: %s %s\n" % (e.status, e.reason))

if __name__ == '__main__':
    result = query_accounts(page_size=1, expand=['billTo'])
    print(result.data)
```

Then run the following command in the terminal:


```bash terminal
python SampleApp.py
```

If the request succeeds, you should get a response similar to the following snippet:


```json JSON
[ExpandedAccount(id='8ad084db91a0cbe60191bbf9fabc069b',
created_by_id='2c92c0f972a852360172bbe22ac551b6',
created_date='2024-09-04T00:40:07-07:00',
updated_by_id='2c92c0f972a852360172bbe22ac551b6',
updated_date='2024-09-04T00:40:07-07:00',
account_number='A00000126',
...) ]
```

Congratulations! You’ve made your first request to Zuora with the Python client library!

## Next steps

We provide step-by-step tutorials for using the Zuora API and client libraries to complete typical business-to-consumer(B2C) business flows. Check our [Tutorials](/docs/get-started/tutorials) to learn more.

C#
C# is a popular object-oriented programming language developed by Microsoft.
.NET is a software framework that provides a runtime environment and a comprehensive set of libraries for building and running applications on Microsoft platforms.

C# is often associated with .NET development as it is the primary language used for building .NET applications.

**Requirement**: C# 12+, .NET 8.0+

## Step 1: Create a .NET project

If you haven't created your own .NET project yet, you need to create one.

For detailed instructions of how to create a new .NET project, see Microsoft's .NET documentation.

## Step 2: Install the Zuora C# library

Add the Zuora client library to your .NET project by installing the NuGet package via your IDE or by running the following command in the .NET CLI:


```shell terminal
dotnet add package ZuoraSDK
```

For additional ways to install the Zuora C# library, see [Zuora client libraries](/docs/guides/libraries/).

## Step 3: Send your first API request

Copy the following code snippet and add it to your entry point .cs file, such as the Program.cs file:


```csharp C#
using ZuoraSDK.Client;
using ZuoraSDK.Model;

namespace zuora_sdk

class Program
{
    static void Main(string[] args)

    {
        // Pass in the client credentials for authentication
        ZuoraClient zuoraClient = new ZuoraClient.Builder()
            .WithClientId("your_client_id")
            .WithClientSecret("your_client_secret")
            .WithZuoraEnv(ZuoraEnv.CSBX)
            .Build();

        zuoraClient.Initialize();

        // Query all accounts. Replace the code below with other code logic in later tutorials
        QueryAccountsResponse accounts = await zuoraClient.ObjectQueriesApi.QueryAccounts();
        Console.WriteLine(accounts.ToJson());
    }
}
```

Note that each method has an async method with `Async` as a suffix.
For example, you can choose to use `QueryAccounts()` or `QueryAccountsAsync()` when querying accounts. The following code snippet is an example using the asynchronous way to query accounts in the Program.cs file.


```csharp C#
using ZuoraSDK.Client;
using ZuoraSDK.Model;
using Task = System.Threading.Tasks.Task;

namespace zuora_sdk

class Program
{
    static async Task Main(string[] args)

    {
        // Pass in the client credentials for authentication
        ZuoraClient zuoraClient = new ZuoraClient.Builder()
            .WithClientId("your_client_id")
            .WithClientSecret("your_client_secret")
            .WithZuoraEnv(ZuoraEnv.CSBX)
            .Build();

        zuoraClient.Initialize();

        // Query all accounts. Replace the code below with other code logic in later tutorials
        QueryAccountsResponse accounts = await zuoraClient.ObjectQueriesApi.QueryAccountsAsync();
        Console.WriteLine(accounts.ToJson());
    }
}
```

If the request succeeds, you should get a response similar to the following snippet:


```json JSON
{
  "nextPage": "W3sidmFsdWUiOiIyMDI1LTAxLTAxVDAyOjI3OjQ3LTA4OjAwIiwib3JkZXJCeSI6eyJmaWVsZCI6IlVwZGF0ZWREYXRlIiwib3JkZXIiOiJERVNDIn19LHsidmFsdWUiOiI4YWQwOTgwYzkzYmE0ZDFiMDE5NDIxNjgzZjJkNDc0YiIsIm9yZGVyQnkiOnsiZmllbGQiOiJJZCIsIm9yZGVyIjoiREVTQyJ9fV0=",
  "data": [
    {
      "id": "8ad096ca898cd7f301898fddd57777cd",
      "createdById": "8ad09fc281b4f9930181c8aa168219f8",
      "createdDate": "2023-07-25T18:43:47-07:00",
      "updatedById": "2c92c0f95e5e8bf8015e5f26b00509e9",
      "updatedDate": "2025-01-09T00:21:50-08:00",
      "accountNumber": "A00147315",
      "additionalEmailAddresses": "",
      "allowInvoiceEdit": false,
      "autoPay": false,
      "balance": 20.0,
      "batch": "Batch50",
      "bcdSettingOption": "ManualSet",
      "billCycleDay": 1,
      "billToId": "8ad096ca898cd7f301898fddd59477cf",
      "communicationProfileId": "2c92c0f95e5e8bf8015e5f26b19d0a71",
      "crmId": "",
      "currency": "USD",
      "customerServiceRepName": "",
      "invoiceDeliveryPrefsEmail": false,
      "invoiceDeliveryPrefsPrint": false,
      "invoiceTemplateId": "2c92c0f95e5e8bf8015e5f26b3910b34",
      "lastInvoiceDate": "2023-10-01",
      "name": "Demo Account",
      "notes": "",
      "partnerAccount": false,
      "paymentMethodCascadingConsent": false,
      "purchaseOrderNumber": "",
      "salesRepName": "",
      "soldToId": "8ad096ca898cd7f301898fddd59477cf",
      "status": "Active",
      "taxCompanyCode": "",
      "taxExemptCertificateID": "",
      "taxExemptCertificateType": "",
      "taxExemptDescription": "",
      "taxExemptEntityUseCode": "",
      "taxExemptIssuingJurisdiction": "",
      "taxExemptStatus": "No",
      "totalInvoiceBalance": 20.0,
      "vATId": "",
      "mrr": 1128.45,
      "creditMemoTemplateId": "8ad08dce80b22c440180b278a56522c5",
      "debitMemoTemplateId": "8ad0848d8799c0a201879c958380310c",
      "paymentTerm": "Net 30"
    },
    ...
  ]
}
```

Congratulations! You’ve made your first request to Zuora with the C# client library!

## Next steps

We provide step-by-step tutorials for using the Zuora API and client libraries to complete typical business-to-consumer(B2C) business flows. Check our [Tutorials](/docs/get-started/tutorials) to learn more.